Many of you know the Fourth of July is my all-time FAVORITE holiday of all the holidays! As I always say, “it’s the most wonderful time of the year!
I love the month of July. I love the heat, I love the long days, and I love that it is truly the center of summer. The flowers are blooming, the trees are ever-green, and the lightening bugs are still out. Many people disagree with me that July is the most wonderful time of the year, but I always try to show them how lovely July is.
And so that brings me to why I like the Fourth of July! This holiday combines all of the above with my love for this country. I really enjoy seeing the bunting, flags, and old-style patriotic decor. It is just such a fun day! I am very happy when I think about how wonderful our country is. It is something I hope we will not lose.
This Fourth of July Lady Belle dressed for the occasion with the perfect skirt and matching scarf. She also wanted to match her “mommy” – which I was all in favor of. Belle was definitely the “belle” of the Fourth of July ball ;).
What did you do for the Fourth of July? How did you celebrate our freedom?
I never understood why the delicious chocolate, peanut butter, and rice cereal treat was called “Puppy Chow.” In fact, I didn’t call it by that name because I thought it was weird. I thought people would find it unappetizing if I served “Puppy Chow.”
Well today, while making this tried and true recipe, I finally understood why it’s called Puppy Chow…
I noticed in my peripheral vision a little friend named Belle conveniently sitting right where I needed to be, watching my every move. It clicked! Chocolate, peanut butter, Chex Rice cereal, butter…all of Belle’s favorite flavors! No wonder they call this Puppy Chow!
Needless to say, Belle assisted with every step. Always ready and willing to taste test!
And so with dog approved confidence, I would say this is some pretty good chow! Try it for yourself and see! *I make my recipe using 6 cups of cereal instead of 9 to increase the chocolate coating per piece, trust me, you’ll never go back to using 9 cups!
Ingredients
1 cup semisweet chocolate chips
1/2 cup creamy peanut butter
1/4 cup unsalted butter
1 teaspoon vanilla extract
6 cups Rice Chex cereal
1 1/2 to 2 cups powdered sugar
Instructions
Place the chocolate chips, peanut butter, and butter in a medium microwave safe bowl. Microwave on high for 1 minute. Remove the bowl from the microwave and stir. Put the bowl back into the microwave and heat for an additional 30 seconds or until mixture is smooth when stirred. Add the vanilla extract and stir again.
Pour the cereal in a large mixing bowl. Add the chocolate peanut butter mixture and gently stir until cereal is evenly coated. Pour the coated cereal into a large Ziploc bag. Add the powdered sugar. Seal the bag and shake until the cereal is well coated. Spread on parchment paper or waxed paper. Let sit until cool and chocolate is set.
Store the puppy chow in an airtight container for up to 2 weeks. If it is warm in your kitchen, store the puppy chow in the refrigerator.
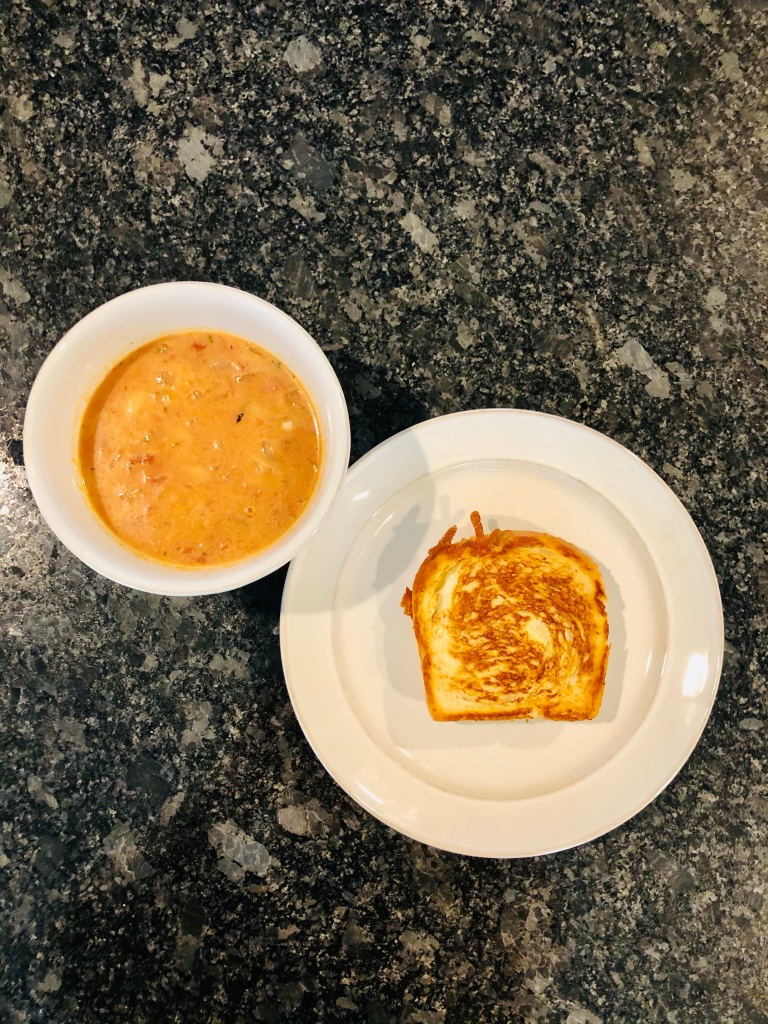
I made a new tomato soup recipe that turned out really tasty! Typically I make Ina Garten’s Tomato & Orzo Soup here. But, I decided to try something new from one of my favorite food bloggers: Half Baked Harvest.
Much like Ina’s recipe, this soup was also super easy, and can be made in one pot. I liked the texture of this soup — it wasn’t too smooth (neither is Ina’s) but it was just tomato, no extras (Ina’s has little noodles). This soup also has a lovely freshness because it calls for pesto. For reference, I just used the jarred basil pesto from Rao’s. It was really good! You can make your own pesto, of course.
Tomato soup always pairs well with bread, so I used my homemade bread recipe and sliced it up to make my own grilled cheeses. How fabulous is that?
Let me know if you like tomato soup! And please share with me if you made this recipe! xoxo Rachel
Homemade bread. The ever daunting, timeless, culinary adventure that every home cook must master, but often times, avoids.
I can tell you I’ve tried my fair share of bread recipes. They are all very easy. Making a basic bread dough, in my opinion, is not hard. My biggest complaint is the TIME. I shared a recipe earlier last year called Quick Rolls. I still stand by that recipe because, like the title, it’s quick and easy. However, I’ve made this bread recipe 5 times in the last week and a half. It has quickly become one of my top recipes. Aside from my sweet husband’s delight with this treat, the other reason I like making this recipe is because it’s realistic for me. I can make it, start to finish, in ONE day, with very little effort.
With homemade bread on the table, I feel accomplished in the kitchen. And the versatility is what I like most. We can enjoy bread with a bowel of soup in the evening, and then have it as toast with eggs in the morning. The flavors are so fresh and delicious! I feel good knowing it’s made with exactly what I put in it, nothing more.
Try out this recipe for yourself, and let me know if it’s changed your mind on bread making! I will be making this recipe for years to come! xoxo Rachel
*recipe from Half Baked Harvest. Don’t be scared of the beer – the bread DOES NOT taste like beer. You can use literally any kind. I’ve been using Yuengling because that’s what I had on hand. I’m excited to try this in the future with other beers. Also, this recipe doubles as a homemade pizza dough!
MAKES: 1 POUND OF DOUGH PREP TIME: 10 minutes RESTING TIME: 2 hours or overnight COOK TIME: 45 minutes TOTAL TIME: 55 minutes, plus resting time
3 cups all-purpose flour, plus more as needed (see Note)
2 teaspoons instant yeast
2 teaspoons kosher salt
1 (12-ounce) beer
1 tablespoon extra-virgin olive oil
In a medium bowl, stir together the flour, yeast, and salt. Add the beer and olive oil and mix with a wooden spoon until combined. Cover the bowl with plastic wrap and let sit at room temperature until doubled in size, 1 to 2 hours.
TO BAKE AS BREAD
When ready to bake, place a 6-quart cast-iron Dutch oven or heavy pot on a rack positioned in the center of the oven. Preheat the oven to 450˚F. Once it reaches temperature, let the Dutch oven warm for 30 minutes.
Turn the dough out onto a generously floured work surface. Using your hands, form the dough into a ball and place it on a large piece of parchment paper.
Carefully remove the Dutch oven from the oven and place the dough with the parchment paper in the center of it. Transfer the pot back to the oven, cover, and bake for 30 minutes. Carefully remove the lid and continue cooking until the bread is a deep golden brown, about 15 minutes more.
Carefully lift the bread out of the pot and place it on a rack to cool completely, about 2 hours. (Don’t slice the bread right out of the oven—you want to let it continue to cook as it cools.)
TO USE AS PIZZA DOUGH
Turn the dough out onto a floured work surface and divide it into 2 equal pieces. Use half of the dough as directed in any given pizza recipe and save the remaining dough, wrapped in plastic wrap, for another use.
Note: To get the right consistency in your dough, start with your base amount of flour, then add more as needed, 1 tablespoon at a time, until the dough is smooth but not dry. It’s better to have a dough that’s on the slightly sticky side than a dough that’s too dry. The dough should be a bit loose; it should not feel dense or heavy.
Anytime my brother visits, he begs me, literally, to make these cookies. He tells me, “but Rachel, the chocolate is so good! I just NEED to have it!” And then he goes on to pronounce “Guittard” in an over enunciated fashion, with upper echelon flare, of course. And ever since I tried out the recipe on the back of the Guittard super cookie chocolate chip bag, I’ve never looked back!
Now, if you know me, you know I am a chocolate chip connoisseur. I can tell you what brand a chocolate chip is just by tasting it. Mind you, I’m no easy judge. I taste on texture, sweetness, bitterness, melting time, etc. Naturally, I have my favorites. Guittard wins in all main categories: milk, semi-sweet, bittersweet, and dark chocolate.
The super cookie semi sweet chocolate chips from Guittard fascinated me. I remember lingering in the baking aisle of the grocery store until a flint of gold colored aluminum caught my eye. I debated about buying it. On first glance, I wasn’t too impressed. I wondered what the great difference could be between me cutting up my own large chunks of chocolate verses the pre-manufactured chip. But, I took a chance. I had faith in Guittard.
What I found out when I made these cookies for the first time is that these chocolate chips made all the difference. I was pleasantly surprised. In the past, I tried making chocolate chip cookies with chopped chocolate to get a liquid effect within the cookies. Unfortunately, they always ended up with an imbalance of chocolate ratio to cookie; the chocolate melted too fast, and took over the entire cookie. With the super cookie chocolate chips, the stabilizers in the chips (to keep their shape) allowed for just enough melting to create a molten chocolate center, but not too much free spread, so it wouldn’t overtake the cookie. The edges were just crisp enough, and the center was not underdone, but the chocolate was liquid.
My little helper, always ready for a taste test
xoxo Rachel
Ingredients
1 cup + 2 tablespoons [174g] unsifted all-purpose flour
1/2 teaspoon baking soda
1/2 teaspoon salt
1/2 cup [113g] butter, softened
6 tablespoons granulated sugar
6 tablespoons firmly packed brown sugar
1 large egg
1/2 teaspoon vanilla
1 ⅔ cups [283g] GUITTARD SUPER COOKIE CHIPS
1/2 cup [60g] chopped walnuts (optional)
Directions
Preheat oven to 350ºF. Line baking sheets with parchment.
In a small bowl combine flour, baking soda and salt. Set aside.
In a large bowl cream butter, sugar and brown sugar until light. Beat in egg and vanilla until smooth. Gradually add flour mixture until combined. Stir in chips and walnuts.
Drop by well-rounded teaspoonfuls onto prepared baking sheets. Bake 8-10 minutes or until golden brown.
Unless you’re new around here, you know I love sharing cookie recipes on my blog!
If you need to whip up a batch of cookies quickly, don’t reach for those pre-made cookie dough packages found in the grocery store. You’ll sacrifice flavor and authenticity!
Make these cookies, and I promise you won’t regret not buying pre-made cookie dough! Your family will love them, and you’ll quickly add this to your memorized recipes you can make in a pinch.
I got this recipe from my new-found cooking hero, Tieghan Gerard, from Half Baked Harvest. Go check her blog out here.
The best thing about these cookies is that you literally put all the ingredients together in one bowl at the same time! No need to let butter get to room temperature. No separate bowls for dry and wet ingredients, no chilling of the dough before baking!
The result: plus a half eaten cookie before I snapped a picture
Please try this recipe, and let me know what you think! I absolutely love them!
INGREDIENTS
2 1/2 cups old fashioned oats
2 cups all-purpose flour
1/2 cup granulated sugar
1 cup brown sugar
1 teaspoon baking soda
1 teaspoon salt
1 cup canola oil use a little more if dough seems is too dry
2 large eggs
4 teaspoons vanilla extract
2 cups semi-sweet chocolate chips or chocolate chunks + more if desired
INSTRUCTIONS
Preheat the oven to 350 degrees F. Line a baking sheet with a silpat or parchment paper.
In a large mixing bowl or bowl of a stand mixer add the oatmeal, flour, sugar, brown sugar, baking soda, salt, canola oil, eggs and vanilla, beat until the dough is moist and all the ingredients are combined. The dough will be crumbly. Mix in the chocolate chips.
Using your hands clump together a tablespoon of dough. Use you hands to really squeeze the dough into a ball. If the mixture is not holding add 1 tablespoon more of oil. Place on prepared baking sheet. If your balls are a little crumbly do not worry, they will come together while baking. Repeat with remaining dough.
Bake for 10 -12 minutes or until set and golden. These are best right out of the oven, so eat up
It’s beginning to look a lot like soup season! I don’t know about you, but I absolutely adore soup. I think it’s delicious, easy, and wholesome. Soups come in so many different varieties, and the possibilities are virtually endless!
Today I’m sharing The Barefoot Contessa’s Tomato Orzo Soup! It is so quick and easy, you can have dinner on the table in almost 30 minutes!
Of course a grilled cheese is always appropriate, so feel free to make one with the cheeses and bread you like! Just make sure to add lots of butter!
I learned a trick from Molly Yeh on her show, Girl Meets Farm, when making grilled cheese! Toast the bread on both sides! That way the inside is crunchy too, and it helps melt the cheese!
Tomato Orzo Soup: Ina Garten
3 tablespoons good olive oil
3 cups yellow onions, chopped (2 onions)
1 tablespoon minced garlic (3 cloves)
4 cups chicken stock, preferably homemade
1 (28-ounce) can crushed tomatoes, preferably San Marzano
Large pinch of saffron threads
Kosher salt and freshly ground black pepper
1/2 cup orzo
1/2 cup heavy cream
Grilled Cheese Croutons
In a large pot or Dutch oven such as Le Creuset, heat the olive oil over medium heat. Add the onions and cook over medium-low heat for 15 minutes, stirring occasionally, until golden brown. Add the garlic and cook for 1 more minute. Stir in the chicken stock, tomatoes, saffron, 1 tablespoon salt, and 1 teaspoon pepper. Bring the soup to a boil, then lower the heat and simmer for 15 minutes.
Meanwhile, fill a medium pot with water, add 2 teaspoons salt, and bring to a boil. Add the orzo and cook for 7 minutes. (It will -finish cooking in the soup.) Drain the orzo and add it to the soup. Stir in the cream, return the soup to a simmer, and cook for 10 more minutes, stirring frequently.
If you like stuffed peppers this recipe will certainly be up your alley!
Instead of taking hours, and making traditional stuffed peppers, I decided to make a more healthy, free-style, version.
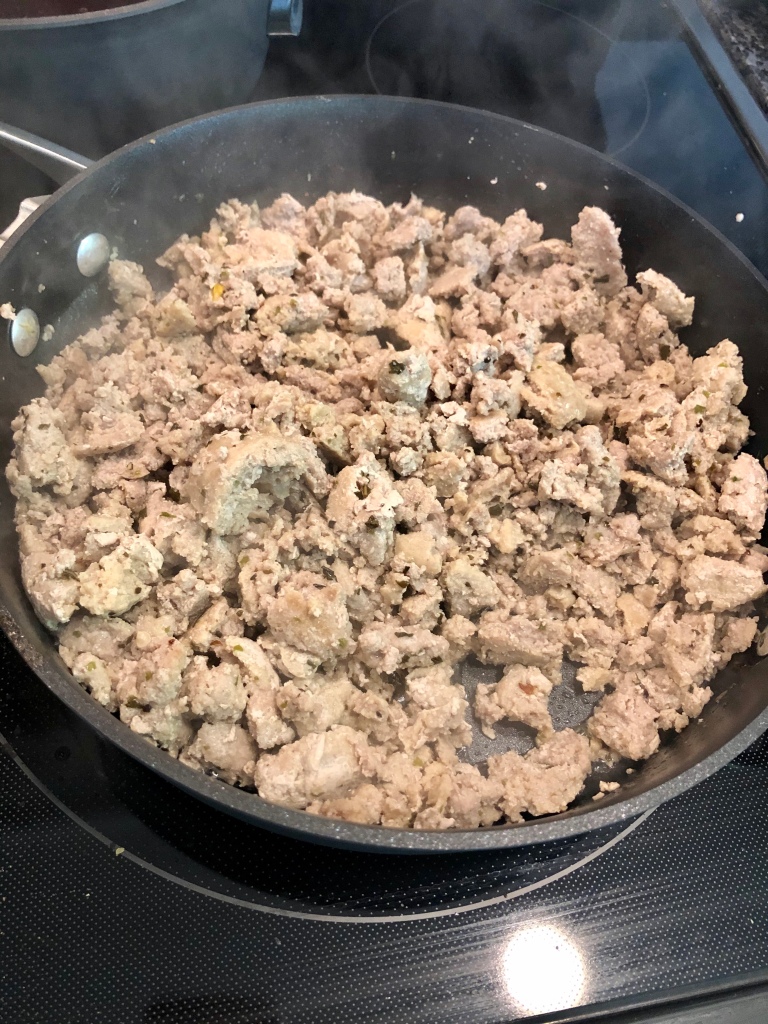
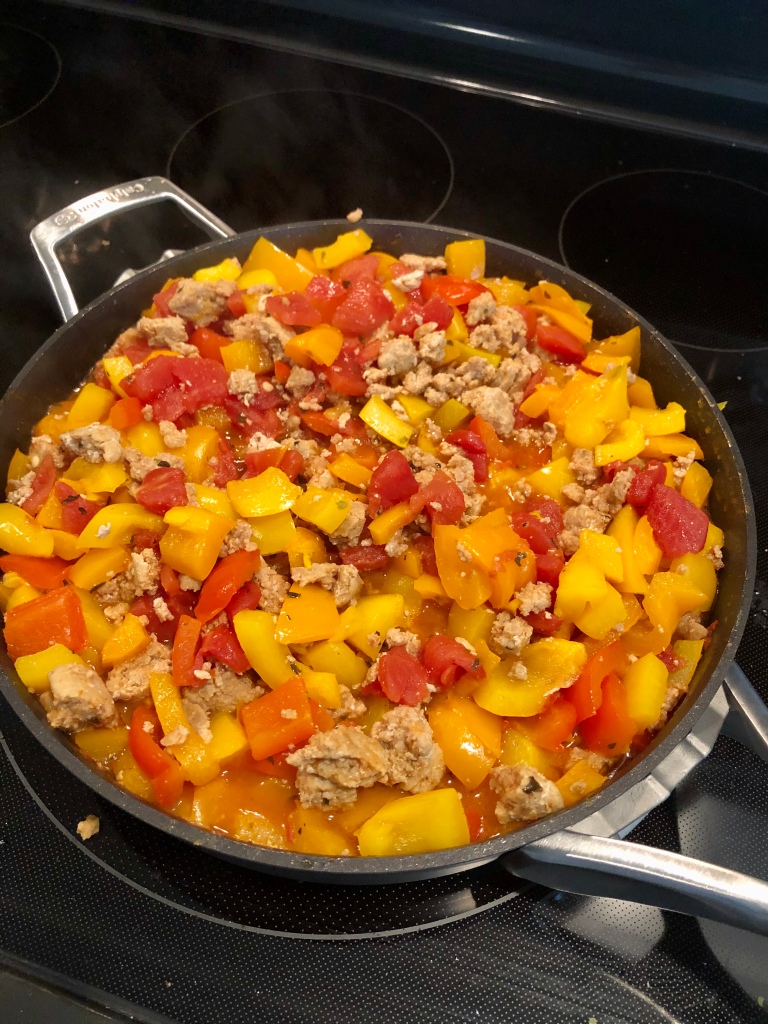
I simply cut up 6 bell peppers (I used 2 red, 2 orange, and 2 yellow). I added in an onion and sautéed until soft and tender.
In another pan I browned ground turkey meat – you can use beef, venison, or anything else you have on hand. I seasoned it with some salt, pepper, and parsley to taste. I added in 2 cans of diced tomatoes with the juices drained out, and simmered for a little while, just so the tomatoes wouldn’t taste bitter.
Next, I made some white rice just following the instructions. I serve this on the side so you can add as much or as little as you want! Mix the cooked meat and onions/peppers together and serve. 🙂
So easy, and so good! I hope you love my unstuffed peppers recipe!
Do you like stuffed peppers? Have you ever tried a version of my unstuffed peppers?
I decided to make my own non pareils! My decision came a little unconventionally when I ordered two 16oz bags of multi colored non pareils — thus mistaking the chocolate confection for exactly what I ordered — two 16oz bags of multi colored non pareil sprinkles… online shopping is confusing.
Needless to say, I still wanted the candy treat. So, I made my own! You can too.
Take about a cup of semi sweet chocolate chips with about ¼ cup of bittersweet chocolate chips – melt in the microwave stirring in 30-60 second intervals. (I didn’t measure anything, but I’d say those are my best estimates). Honestly, just throw whatever amount of chocolate chips together and melt them! It will turn out fine!
Next, I took a spoon and dropped the melted chocolate onto parchment paper. I then sprinkled the non pareil sprinkles over top of every single inch of the chocolate disks! Let them cool, then put them in the refrigerator to chill. Once chilled, you can easily remove the candies and store them beautifully in a mason jar to eat whenever you please! More importantly, don’t forget to share with your friends!
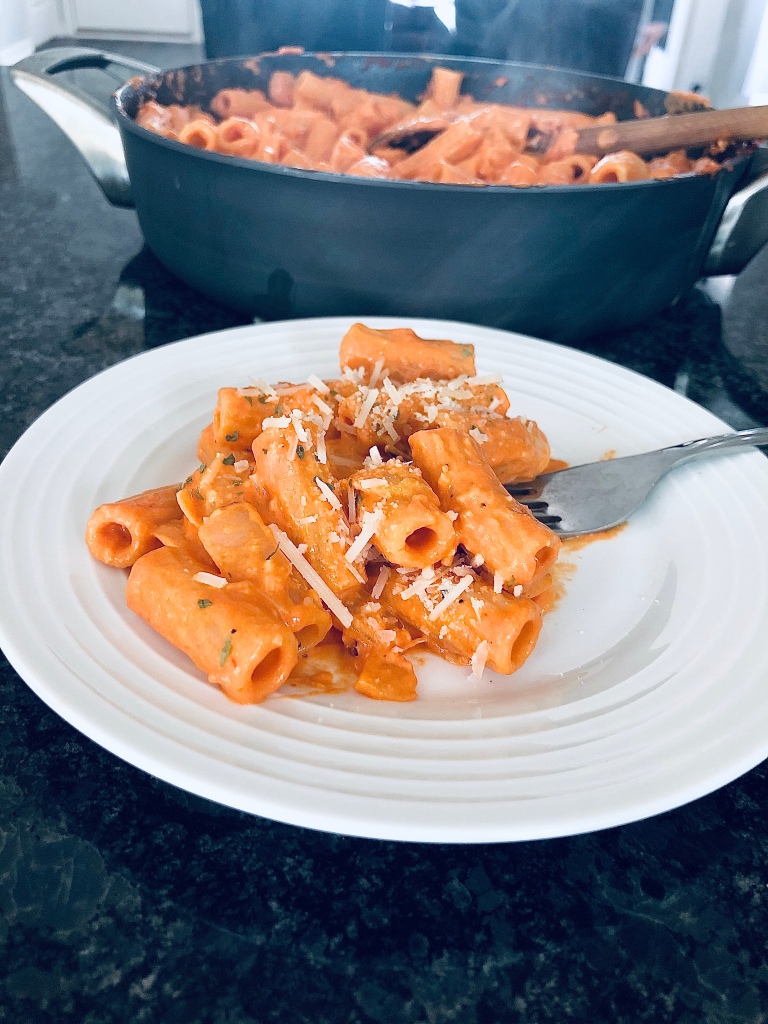
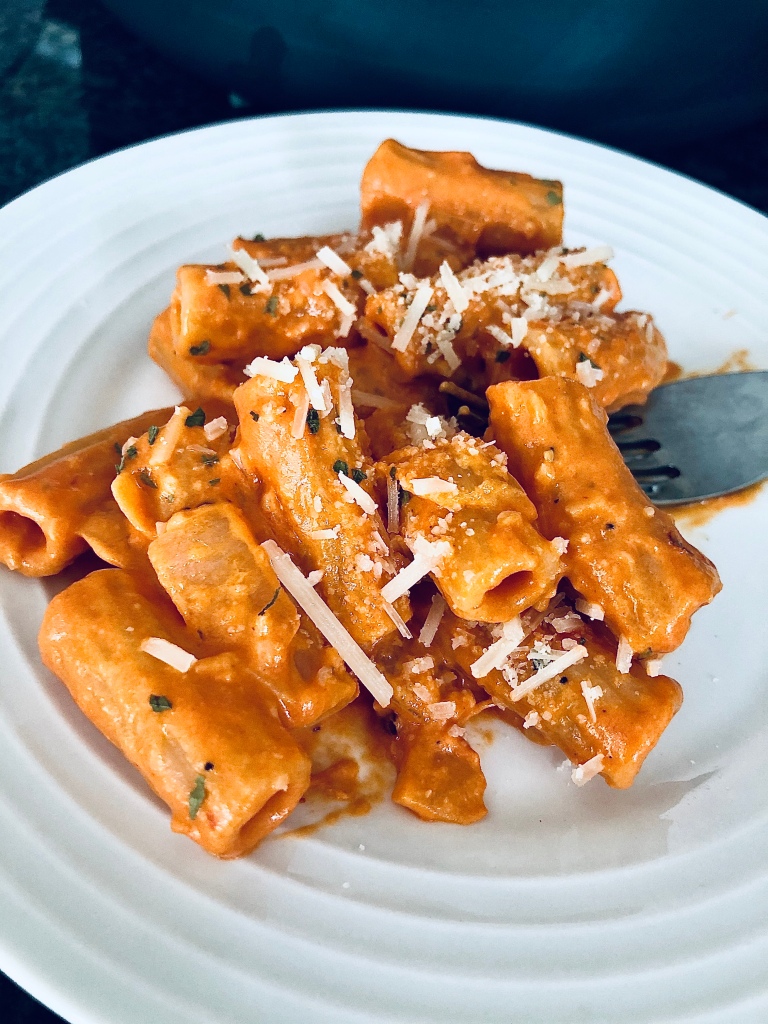
I know what you’re thinking; “how can you make ‘Penne Alla Vodka’ without the vodka?!” Answer: I didn’t have any. Now, what I’m here to tell you is that this penne sans vodka turned out so delicious that I found it worthwhile for me to share.
If you have vodka, I’d say there’s no harm in adding it, because it will complement the flavors. However, if you do not have vodka on hand, or you would prefer to skip it, this recipe will still taste so delectably good! Trust me, I could not stop eating it!
I got the recipe from the gorgeous super model, Gigi Hadid. If you aren’t familiar with who she is, just open any fashion magazine, and I’m sure you’ll find her.
I had to make a few quarantine alterations, and by a few I mean several; so don’t feel bad if you have to do the same. Vodka being the main one, but coming in a close second… I also didn’t have penne — so I used rigatoni. The irony of this recipe! I did not have fresh garlic on hand, so I had to used jarred. And I substituted an onion for the shallots. If you don’t have heavy cream you can just use milk and add some butter to it (luckily for me I had exactly 1 cup left of my heavy cream!). Lastly, I used red pepper flakes instead of chili flakes. Essentially I morphed this recipe into what I needed to make it, but it still turned out great! So easy, so quick, and a delightfully fresh flavor.
There’s two things that make this recipe (in my opinion). 1.) the tomato paste and 2.) the pasta water (heavily salted if you are using my pasta water). I think without these two ingredients it changes the flavor of the whole dish fairly drastically. Not to worry if you don’t have tomato paste, I think the tomato flavor would be a little less intense, so I’d recommend going lighter on the cream. It always interests me how quickly a recipe can change; but then again, that’s the beauty of cooking!
Let me know your quarantine alterations (if any) for this recipe when you try it out! I’d like to hear about some fun alternatives!
If you have been missing your favorite treats at your local bakery, or, you just want to try out a new recipe that works perfect for breakfast, dessert, or even a mid-day snack, you’re in luck! These doughnuts are absolutely spectacular.
You can prepare this recipe in under an hour, and you wouldn’t know they aren’t fried! The cinnamon and nutmeg within the doughnut batter create a very rich and flavorful taste, but once you roll them in a delicious cinnamon sugar coating, these doughnuts are over-the-top. I’ve found that coating the doughnuts on all sides (and every little inch) provides the best experience. I also believe you should coat them maybe a little heavier than you’d think if you are serving them the next day because some of the coating soaks in overnight.
All that aside, I hosted a lovely Mother’s Day brunch over the weekend, and this was one of the recipes at my table. I can assure you all the guests loved these. Out of 12 doughnuts, none remained! I also have to state, I don’t even like doughnuts. I know, you’re probably thinking I’m nuts to try a doughnut recipe and rave about it if I don’t like doughnuts…but that’s my point! You’d never see me flat out order a doughnut at a bakery; it’s just not something I desire. But these? Yes. Two please!
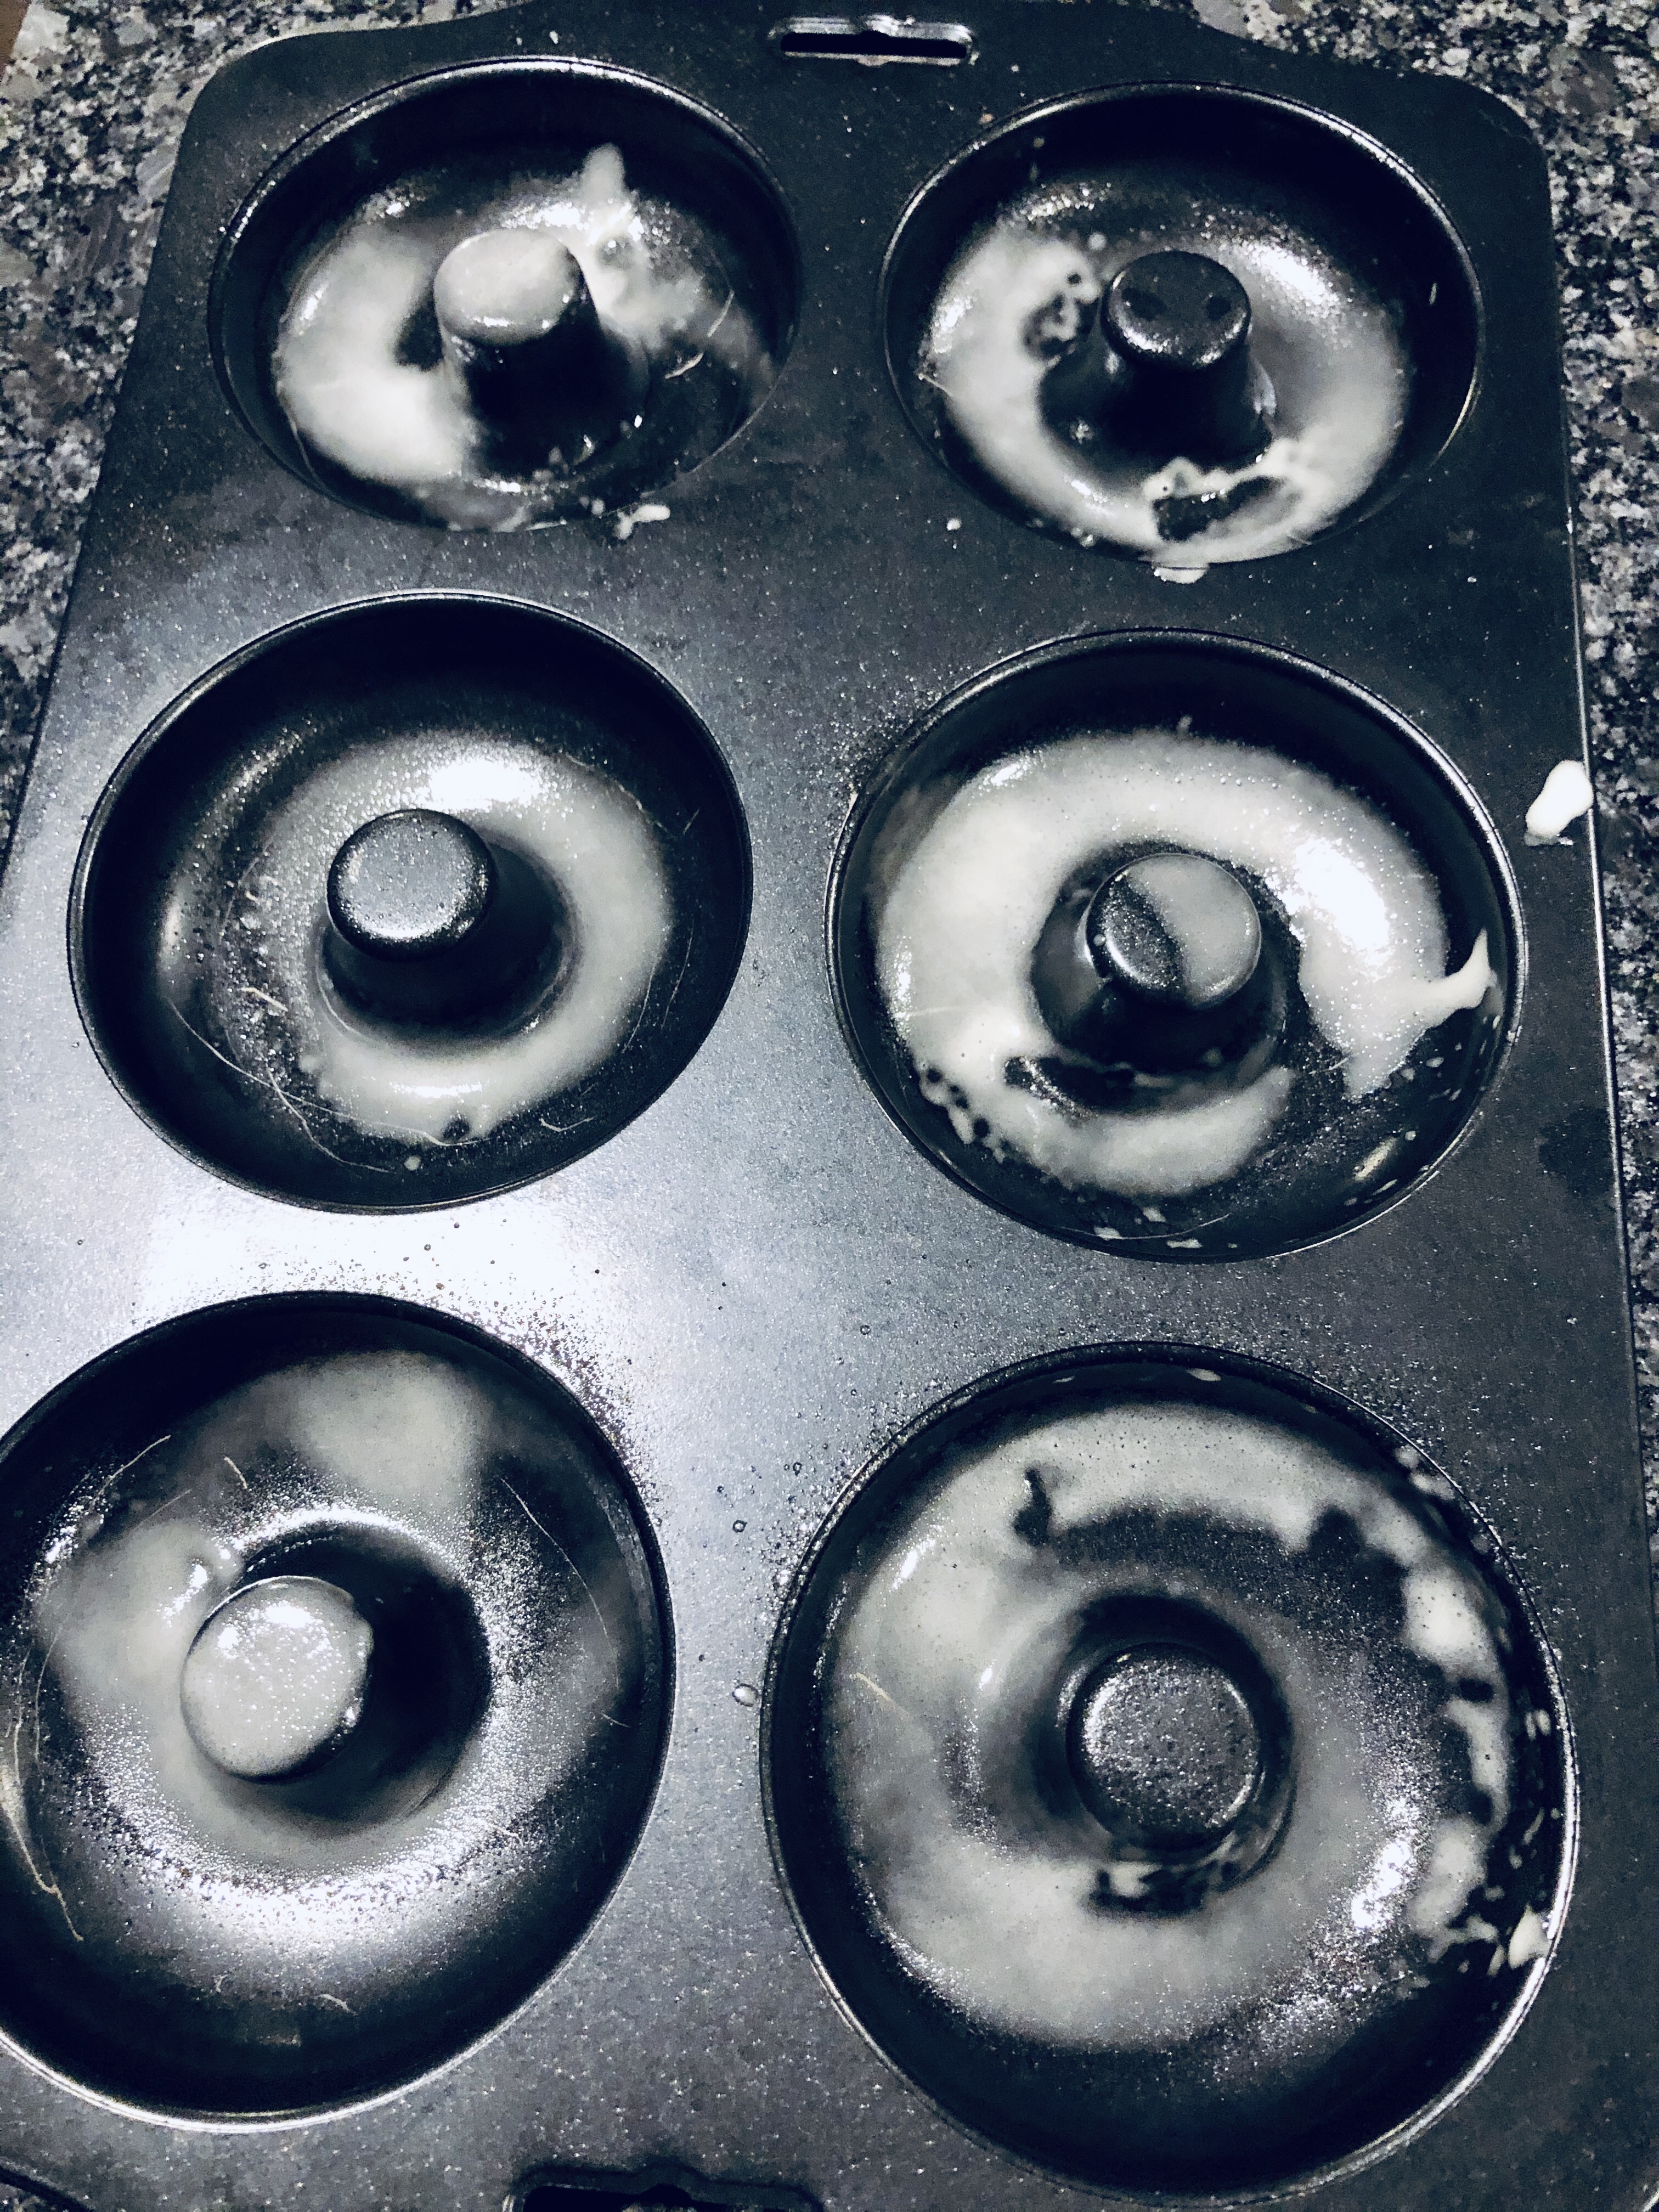
Now, the doughnut pans. We’re in the middle of a pandemic people, so I would encourage you to not panic. If you “donut” have doughnut pans (pun intended) then maybe try the recipe in a cupcake pan or a mini cupcake pan. If you don’t have that, try a loaf pan, (I’d say just cut the cooled loaf into slices and then continue on by dipping them in butter and rolling in cinnamon sugar). You could also try ordering doughnut pans off the internet and wait for delivery. Do whatever you feel comfortable with! I promise you that you can make this recipe work though!
Below is the recipe from Ina Garten, the Barefoot Contessa (one of my favorite cooks)! She provides a quick measure for the cinnamon sugar topping – feel free to follow it precisely, but I just throw my own amounts together. I also add a heavy amount of cinnamon to the sugar. I think it makes the doughnut way tastier!
I made The Pioneer Woman’s recipe for lasagna, titled, “The Best Lasagna Ever” … let me tell you, it was!
What I love about this recipe is that it combines the perfect blend of beef and sausage, as well as just the right amount of spice. The homemade sauce is absolutely delicious. It’s truly the easiest thing ever, and really, it is what I believe makes this lasagna.
The Pioneer Woman used thinly sliced mozzarella, but a “game changer” I’d like you to consider is using fresh whole milk sliced mozzarella. It’s sliced a lot thicker, and has a higher water content and to me, more flavor. I used Belgioioso, but you can use whatever brand you’d like! I broke up the thick slices by hand into pieces (nothing perfect or the same size, each a little different) and sprinkled it over. It melts so beautifully! Cheesy, but not too cheesy!
Also please use cottage cheese in this recipe! A lot of people like to substitute ricotta cheese for cottage cheese in lasagna, and I feel like you will completely miss out if you do that! This recipe works perfectly using cottage cheese. Trust me, it won’t turn out soupy!
Once you try this recipe, let me what you think! Is it the best lasagna ever? For me, this is my official lasagna recipe from now on — in fact, I think I’ll heat up the one I made already and put in the freezer. Yes, it’s that good.
A side angle to show you that beautiful melted cheese
I’m sure everyone has his own favorite lasagna recipe, but I’d just like to offer that this really is The Best Lasagna Ever. Part of its appeal is that the ingredients used are totally basic. Anyone can make this, anywhere, anytime. And it’s the easiest thing in the world. Aside from the simplicity and availability of ingredients, however, this lasagna is just dadgum good.
Ingredients
1-1/2 pound Ground Beef
1 pound Hot Breakfast Sausage
2 cloves Garlic, Minced
2 cans (14.5 Ounce) Whole Tomatoes
2 cans (6 Ounce) Tomato Paste
2 Tablespoons Dried Parsley
2 Tablespoons Dried Basil
1 teaspoon Salt
3 cups Lowfat Cottage Cheese
2 whole Beaten Eggs
1/2 cup Grated (not Shredded) Parmesan Cheese
2 Tablespoons Dried Parsley
1 teaspoon Salt
1 pound Sliced Mozzarella Cheese
1 package (10 Ounce) Lasagna Noodles
(add 1/2 Teaspoon Salt And 1 Tablespoon Olive Oil To Pasta Water)
Preparation
Bring a large pot of water to a boil.
Meanwhile, in a large skillet or saucepan, combine ground beef, sausage, and garlic. Cook over medium-high heat until browned. Drain half the fat; less if you’re feeling naughty. Add tomatoes, tomato paste, 2 tablespoons parsley, basil and salt. After adding the tomatoes, the sauce mixture should simmer for 45 minutes while you are working on the other steps.
In a medium bowl, mix cottage cheese, beaten eggs, grated Parmesan, 2 more tablespoons parsley, and 1 more teaspoon salt. Stir together well. Set aside. Cook lasagna until “al dente” (not overly cooked).
To assemble: Arrange 4 cooked lasagna noodles in the bottom of a baking pan, overlapping if necessary. Spoon half the cottage cheese mixture over the noodles. Spread evenly. Cover cottage cheese with a layer of mozzarella cheese. Spoon a little less than half the meat/sauce mixture over the top.
Repeat, ending with meat/sauce mixture. Sprinkle top generously with extra Parmesan.
Either freeze, refrigerate for up to two days, or bake immediately: 350-degree oven for 20 to 30 minutes, or until top is hot and bubbly.
This is a quick and easy meal for when you don’t know what to make, or you don’t have much time. You can change, add, or delete anything you’d like!
I had some pork chops in the freezer, which I thawed in the refrigerator overnight. I seasoned the pork chops with a little salt, pepper, and a dash of paprika. I chopped up an onion, added two cans of sauerkraut, topped it with a few pads of butter, and threw it in the oven until the pork chops were white, tender, and the juices ran clear – maybe about an hour or so at 350 degrees.
Boy was this meal tasty. You can add in some mashed potatoes as a side dish with a little salad, or just have this as the whole meal. It’s great reheated.
Recipe:
Raw pork chops (fresh, or frozen then thawed), an onion or two; chopped, sauerkraut (I just used canned), a few tablespoons of butter to top the mixture. Optional add in: about a half a can or beer (any kind you like!). Bake at 350 degrees for about an hour — less or more depending on the size and thickness of your pork chops.
What I love about this recipe is that it is just so fast. I usually steer clear of recipes that take hours upon hours because I like seeing results and, quite frankly, I don’t think I’m patient enough to watch bread rise. With this recipe, you will not feel bound to the kitchen anxiously awaiting your finished product.
After making this, I decided I’m not buying store bought rolls anymore! It’s that good, and that easy! I plan to make these in larger batches and freeze them so I always have homemade rolls on hand.
For the water, I just use hot tap water. It’s important to make sure your oven reaches 450° F. (my oven takes 35 minutes). For the overnight method, simply switch to COOL water and let the dough rest overnight on the counter top for 8 to 24 hours. Be sure to aerate your flour before measuring. – Jenny Jones
Prep Time: 5 minutes
Cook Time: 25 minutes
Total Time: 4 hours
Makes: 8 rolls
Ingredients:
2 1/2 cups (320 grams) bread flour or all-purpose flour
1/4 teaspoon (1 gram) instant or dry active yeast
1 teaspoon salt
1 1/4 cups hot tap water (up to 130° F)
Instructions:
In a large bowl combine dry ingredients. Stir in water. Mixture will be thick and sticky.
Cover with plastic wrap & let stand on counter top for 3 hours.
After 3 hours (mixture will be puffy and bubbly on top) place dough on a well-floured surface. Using a scraper fold over about 12 times, adding enough flour so it doesn’t stick (about 2 Tbsp).
Using a scraper cut dough into 8 pieces. With floured hands, shape each into a ball by folding and tucking, like making a drawstring bag.
Place on parchment paper-lined baking sheet (not wax paper) & cover with a dish towel. Let stand at room temperature for 35 minutes. They will puff up but will not double in size.
As soon as rolls are covered, start preheating oven to 450° F. Oven must be 450° so use an oven thermometer if possible.
Bake for 25-30 minutes until golden brown. To re-crisp the next day, preheat the oven to 325° F and place the rolls directly on the oven rack for 10-12 minutes.
Want These Rolls Faster? Click here for my NEW 2-Hour Crusty No Knead Rolls.
To Freeze: Once baked & cooled, they freeze beautifully. To re-crisp, place frozen rolls directly on the oven rack in a preheated 325° F oven for 10-12 minutes. They’ll be even more crispy than first-baked!
Variation: To make sesame seed rolls, gently brush rolls just before baking with egg white and sprinkle with sesame seeds.
I’ve pondered for over a year, back and forth, on how to return to my blog; but I couldn’t do it, I didn’t know how. I needed to be inspired.
Yesterday, my family kitty cat, Emma, passed away humanely. And for that, I am deeply saddened. For those of you who have lost a pet, you can relate to the earth-shattering pain, and deep sorrow you feel knowing that special little creature will no longer be there to greet you tomorrow.
Last night, I took myself back to the day we got Emma. I retraced each step in my mind of our first day together, and I remembered how truly excited and joyful I was – the whole way there, and the whole way home. And, at 1 in the morning last night, I came back to the blog, because I remembered I wrote a post about Emma, and how we met. (Feel free to relive the serendipitous memory via this link). It was sad to read, but also very happy. I chuckled at different parts remembering her little personality and cute, small, fluffy, body, all the way back then. Emma was something else. She was a carefree, laid-back kitty cat. I thought back to all the nuances that made Emma “Emma.” Like when she would hide under my bed for hours, but refuse to join me on the bed, yet right after I finally turned my lamp off and got comfortable, I would hear her jump nimbly onto my bed with a little chirp and get cozy by my feet. Last night, I swear I could hear her do that.
Emma wasn’t much of a lap cat, but she always showed you she enjoyed your company. She was there for every project. Laundry, bills, homework, computer-work, and even projects that require assembly — she liked to be involved. In fact, this past Christmas she decided to join me on the piano. Not only was she there for every song, but when I took a brief intermission she decided to climb on top of the piano and walk across the keys, playing a tune only she knew.
She loved shoes, she loved exploring, and she liked running away super-fast when she heard something “scary” (usually a plastic grocery bag). I recalled how my grandfather mentioned, several years ago now, his observance of Emma’s unusual nighttime routine, and chuckled. He said, “did you ever notice that around 11 o’clock at night your cat gets real crazy and runs around the house, and up on the back of the furniture? I was just sitting there reading my hunting magazine and all of the sudden she jumped up behind me on the back of the sofa and raced by! I thought it was a coincidence the first night, but after the third night, I’ve come to realize it seems to be a routine.” After his comments we too realized he was completely correct; every night around 11 or 11:30pm Emma would go “crazy” running around downstairs and hopping on-top of furniture.
I thought back to all the fun times we had together – her dropping a toy mouse off in silly locations, and us, hiding it somewhere for her to grab again. I saw her leap enthusiastically to catch a string while we played with her. I pictured us giving her kitty treats, and teaching her how to say “please.” I reminisced to all the times we’d call her for minutes on end, with her purposefully selecting not to hear, then whispering “Fancy Feast” and seeing her appear within seconds…
What brought me back to this blog was Emma. It is that cute, curious, little kitty cat, Emma that brought me the inspiration to write again. 🙂